Friday, December 7, 2012

Mourning attire & winning a costume contest

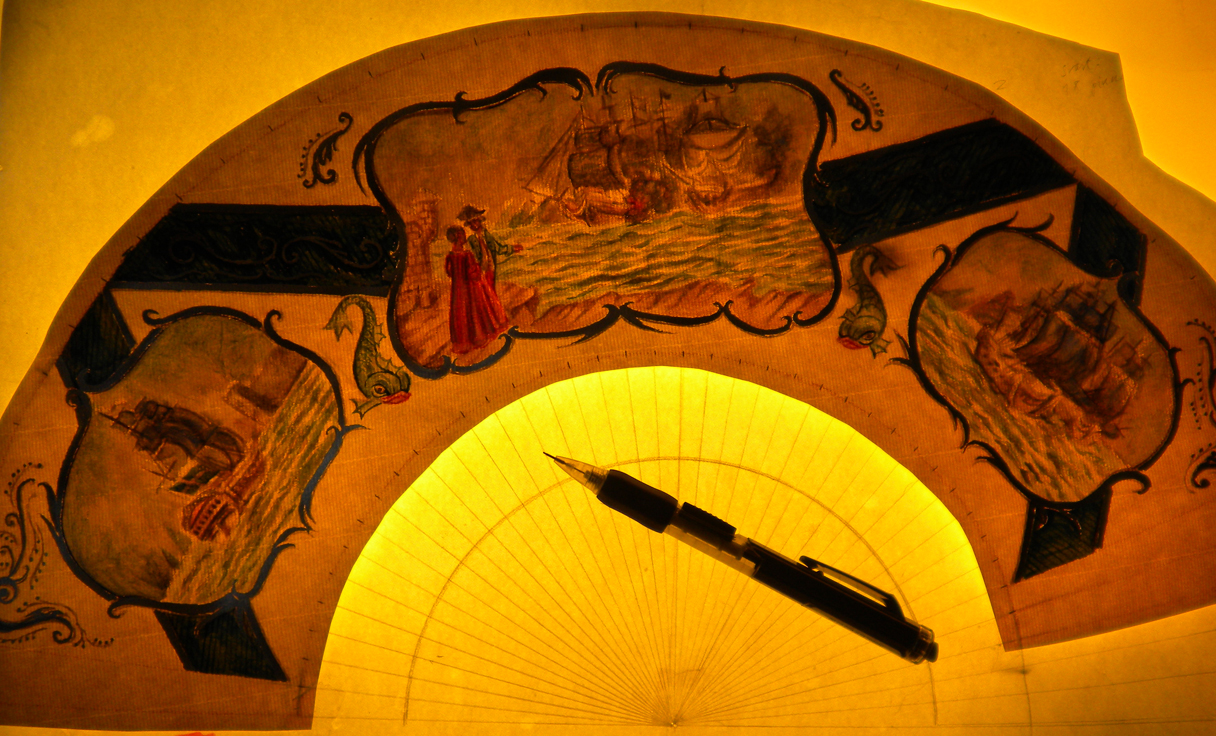
For obvious reasons, mourning fans are probably not on top of anyone's wish list, but I have still missed a matching fan to go with my black polonaise... Halloween was the perfect excuse to finally make that fan - and wear the dress again, anyway.  (Has it been five weeks already? I guess I need to update more often... Oh well.) The fan was inspired by an original found somewhere on the net (probably Ebay). Interestingly, it sports one of the most simplistic and naïve paintings that I've ever seen on an 18th century fan. Because of this, it was also unusually quick and easy to copy.


 The polonaise mentioned was originally made to be worn on stage when I was a backing operatic-style vocalist in a band quite long ago, which is why it might not be completely historically accurate...  In any case, on 18th century events I have mostly been wearing it on the yearly memorial service for king Gustaf III in Riddarholmen church in Stockholm, and on some masquerade balls...

I may look bored, but I'm supposed to be a vampire, you know...


Of course it's a rather heavy thing to wear on a night out, but it's still perfect for Halloween. Especially if you're going to a party with a costume contest, which I did on this particular night. And guess what - I actually won the whole thing! :-)
Not only that, my zombie friend Lena placed herself as number three in the contest as well. Sadly, however, I didn't manage to get better photos from the occasion than these...

My zombie friend and I

Saturday, October 13, 2012

An 18th century emergency kit

Dreams and downright nightmares always tend to follow specific, recurrent themes, and judging from my own and my friend's personal experiences, there seem to be at least two rather similar ones that are common among reenactors.

"Oh no, how am I supposed to get into the car now?!"
Number one is "delayed for the ball".
You are on your way to the event of the year, and after the usual, slow dressing procedure you are about to leave, looking great in your best toilette. Or so you thought, for you have somehow managed to forget to do your hair... your poor unkempt tresses are hanging about your face as on a particularly shaggy sheep dog. And not only that – now that you know that you will be delayed by at least one hour, the clock shows that the ball is just about to start...! And you were positively sure that you had plenty of time... Further dressing incidents, delays and agonies usually follow, and you never manage to get to your destination...

Number two is ”the magically disappearing clothing articles”.
Curiously, a friend of mine who has only been to one 18th century ball in her whole life so far, had the following dream several days before the event:
She was at the ball wearing her dress, looking and feeling perfectly all right. When all of a sudden, she discovered that her stays had magically disappeared, leaving her with the bulky look of a Butterick costume from hell. Then she looked down on her feet, and realised with horror that her shoes were gone and that she was walking around in stocking feet – modern sports socks too! - under her fancy skirts...

Those dreams may of course have a much deeper meaning than mere fear of missing a party or fear of looking and feeling more or less awkward and historically incorrect. Still, forgetting basic garments, accessories and details while packing before attending an event IS a nightmarish possibility even in waking life - as every reenactor knows.

"I know I must have forgotten something..."
Due to problems of a logistic nature, I haven't been reenacting a lot lately (which you probably have noticed from my virtually nonexistent blog posts and pictures on the subject.) Something which of course has made me more afraid of forgetting something vital next time... So, I have taken the time to write a list on what should be in every lady's ”18th century emergency kit”:
  1. Pins, needles, safety pins (and maybe even some sewing thread!)
    Sooner or later something will fall off your dress: some trimmings, your stomacher, and if none of that happens, someone will step on your train and rip your dress apart...
  2. Some yards of extra ribbons for corsets and lacings.
    Oh yes, it happened to me once when I was about to put on my green, front laced fran
    çaise... the ribbon broke (luckily I was able to tie it together and still get it through the lacing holes).
  3. Hairpins, hairpins and tons of hairpins
    Because of the simple fact that late 18th century fashion in particular demands no less of your hair/wig and headwear than to defy the laws of gravity...
  4. A small bottle of hairspray.
    Say no more.
  5. Some yards of extra ribbons for the hair (to bind up and conceal mistakes and potentially missing hairpieces, of course).
  6. Mouches/beauty patches (and maybe some mastix glue). In case your makeup rubs off leaving glowing red patches here and there... and offering a new aquintance a mouche might be the start of a beautiful friendship too, who knows? ;-)
  7. A small set of cards, playing cards, tarot/whatever... a great way to pass time on more quiet occasions. 

    My personal kit.
    So, what do you people keep in your "emergency kits"? And has any of those nightmares about missing pieces ever really come true for anyone of you? As far as I can remember, it has only ever happened to my hair (and several times too!), but that's stuff for a later article...

Tuesday, August 7, 2012

A sticky problem, partly solved.

As you probably know by now, I almost always have to compromise on the authenticity of the sticks on my fans. Sometimes though, I manage to find materials (and inspiration) to make my sticks almost as pretty and period correct as my fan leaves.
Inspired by the design on the Chinoiserie fan below, I couldn't help but try to make something similar after purchasing a couple of the plain black wooden sticks from Nehelenia Patterns...

A fan from my small collection (from 1780 or so, according to the Ebay seller), made of paper and lacquered wood. It has a rather odd shape since it hardly even measures a quarter of a circle when fully opened. I guess that has to do with the fact that the leaf was glued over with silk on both sides in the 19th century.


And here is the result... not  too bad, in my opinion. It didn't take that many hours to paint, either.


This design on the guardstick was copied (well, almost) from the antique fan above.
 But not perfect. Because unfortunately, the shape at the bottom of these modern sticks always have the annoing extra 2 cms of stick below the central pivot, as you can see here:

I might, just might, bother to replace the modern loophole rivet with something fancier and  more period-looking.


Oh well.
As for chinoiserie designs on fan leaves, I don't really feel tempted to copy a traditional "exotic" Chinese leaf for this fan, it would remind too much of those cheap, modern Chinese things that most reenactors tend to use... But I'm sure it would look lovely with a green or red leaf with flowers and urns/birds in vignettes and sequins... preferably a silk leaf. Unless anyone out there with a better idea feels like ordering a custom fan? ;-)


Tuesday, July 10, 2012

Midnight pique nique

I have no new fan pictures this time, I just want to share some photos from the midnight picnic that took place in the Drottningholm Palace Park last weekend...
Only ten persons showed up, those from Gustaf's Skål that weren't on vacation were probably afraid that it would rain after a week of rather unstable weather conditions... Well, it did, but so little it really didn't matter, and the park was even warm and cosy enough to sleep in (even if no one did after all).

Unfortunately, almost all my pictures turned out very blurred, but if I have to choose I almost prefer that to a flat, unflattering flashlight, it was supposed to be a nocturnal event after all....

Moi

It's getting dark...


Ellinor resting

Midnight in the labyrinth. There were lots of bats fluttering around us...

Ellinor and Apollo


Tuesday, June 12, 2012

Decoupage fans!


There were many kinds of decoupage fans in the 1700s, and among those, paper fans with punched holes imitating lace are common on many specimens from the mid-to-late part of the century. Fans with leaves of real lace with paper vignettes and figures decoupéed onto the leaf have also been seen, if not so frequently. (There is a common misconception claiming that lace leaves did not exist at all in the 18th century, which they did - but they were very expensive and are extremely hard to find today. See Katmax page on Livejournal for more info on the subject.) And as the 1790s approached, there were also fans with cut out prints, or engravings - often depicting classical scenes or portraits, which were sometimes hand coloured. The prints were glued onto the leaves, which could be made of paper, silk or sheer organza, and "secured" by sewn-on sequins around the edges. Sometimes the prints were cut into strips and mounted on brisée fans entirely made of intricately carved ivory or wood.

A simple and very pretty original fan found (and, alas, bought by someone else) on Ebay some months ago.
I have lately discovered that the simple decoupage fans with single, cut out prints are relatively easy for me to make, as long as I use a copy of an original 18th century print, a paper leaf and a modest amount of sequins. Moreover, the designs often match the simple wooden sticks that I have to make do with most of the time, very well.
So if you're into the fashion of the late 80's or the 90's, it is now possible to get a lovely fan for a very reasonable price, both as ready-mades and on commission - the prices for my decoupage fans start at $154 (1100 SEK), while you have to pay at least twice as much for a hand painted fan! By the way, to keep the prices at that level, they are normally delivered without boxes.

A nice cream coloured fan made by yours truly a week ago or so. The print is an engraving after Angelica Kauffman called "Love and Beauty".

The red Marie Antoinette fan below is for sale in my new Etsy shop right now (alongside the Louis XVI fan on the Ready mades/Sales page and some Gothic jewellery and related stuff).


Friday, May 11, 2012

Fan making process - a nautical fan 3

The leaf is painted in watercolour and gouache...


...decorated with silver colour...


(And, in this case, cut out roughly with scissors, leaving a margin of at least a centimetre on each side. Normally I won't do that until after the next step, where the leaf is taped onto the template again.)


So, the leaf is taped onto the template once again and put upon the lightbox to mark out the folds. This is a crucial step, since it's EXTREMELY important that each fold gets in the right place... :-{ (Not too easy, since the leafs always get a bit wavy from all the watercolour paint, which is obvious on the picture below.)


The creases are marked out on both sides.


The leaf is pleated on a special board.


The lower edge of the leaf is trimmed (the upper one should not be trimmed until after the leaf is mounted onto the sticks - to avoid tears and swearing and a ruined fan.)


The leaf is glued onto the sticks. (Also a very crucial step - if one uses too much glue the folds might glue together in some places *aarrgh*!) And the upper edge of the leaf is trimmed with scissors, very, very carefully on the closed fan.


The edges are painted with silver colour. And as a final step, I make a nice, period correct fan box out of rolled cardboard, tape, scrapbook paper and glue.

Et voìla! :-)

Sunday, April 22, 2012

Fan making process - A nautical fan 2

The paper which will be used for the "real" leaf is put onto the lightbox, and the design is traced through with red pencil.


Then I start painting the "medallions"/vignettes in watercolour and gouache, first as black and white "underpaintings"...


To be continued...

Wednesday, April 11, 2012

Fan making process - A nautical fan. 1

At the moment, I am making a fan with a nautical motif for a lady in the States. The style is supposed to be 1760s - up to the early 70's, and it will have a colour scheme of sea blue (of course), cerulean and silver on cream. She wants images of ships and a couple, so I have found inspiration in images of fans like this one below...

Not 1760s or early 70's, but nice enough...
I have tried on several occassions to write down the whole process of fan making as a hand book for myself, in order to avoid the most common mistakes. But, every time I have managed to forget something important, so that hand book would be unreliable as well as incredibly dull.
So, I will not share the whole process here, just a few selected parts...

I usually start by making a quite rough sketch of the motif...


To start with, one needs a template drawn from the *exact" measurements of the sticks, which determines not only the shape of the fan, but where all the folds will be placed...

Sticks!
The template is placed upon a lightbox (with tape, it is very important to make sure that the ¤%&ing thing doesn't move).
Template for a set of Chinese wooden sticks

Then, a paper is placed upon the lightbox, and the outlines for the fan leaf are drawn...
It is always the number of folds (or sections), which all have the same shape as the guard sticks, that determine the width of the fan, or the fan leaf. Without proper measurements, the folds get very uneven, making large sections of the leaf bulge out of the closed fan, and we don't want that to happen. (Of course it did, to some degree, on all my fans at the beginning of my "career".)

Therefore the sections/folds have to be counted numerous times, along with the number of sticks on the "skeleton", before continuing with the next step.


The outlines are drawn and I have cut out the shape which is to become the template for the fan leaf.
The leaf is folded to mark out the middle.

The design is drawn onto the template. On fans with vignettes like these, I start by drawing on one half of the fan, and trace through the second half reversed on the lightbox.

Next time, I will start on the real leaf.
To be continued...

Wednesday, March 14, 2012

Half an 18th century fan

When I found a complete and unbroken set of original 18th century bone sticks on Ebay a while I ago, I decided to make a really nice fan for myself just for once.

The fan was in a quite sorry shape when it arrived, even the rivet had fallen out and the whole thing was held together by a paper clip. I took it to the goldsmith who feared that a repair would break it, so I had to use a tongue piercing barbell and glue (this was not the first time, I might add). I love to see the staff's faces every time I enter the tattoo parlours with a nice old fashioned fan in my hand...


"Monture á la Anglaise".

The sticks are supposedly from 1790, but since the inner sticks are plain and rather similar to earlier stick designs I decided to make a leaf in early 1780's style, which should match most of my outfits better.
Now that it's finished, I realise that I should have made a silk leaf instead, I can't really say why I used paper. When I compared the result to one of my antique fans, I noticed even more that modern paper is about twice as thick as paper from the 18th century. The fan in question has a double leaf which is actually thinner than the single leaf on my newly made fan... and sticks that are more than 200 years old might be a little bit too fragile for thick, coarse modern paper... as you can see on the reverse, I had to strenghten the thin wooden strips on the upper part of the sticks to prevent them from breaking.
Oh well.

So, modern wooden sticks are not so bad, after all... wood is rather elastic and doesn't break quite as easily as bone. I don't really know if I have the guts to use this fan a lot, breaking it would be an unforgivable sin...

Friday, February 24, 2012

As white as innocence itself...

I found these *coughs* beauties at a cheap chain store for only 50 kronor (about $8) each. Lovely.


I am especially fond of the phallus-shaped form of this one...

Now all I need for the next ball is one of those "Marie Antoinette" dresses from Lip Service... and a plastic fan with shiney white chicken feathers, of course. Oh, and I almost forgot - a nice glowing tan to contrast with the white wig and crown the appearance.


On the other hand, cotton wool would probably work just as well... and it's even cheaper! ;-)

Monday, February 6, 2012

New updates!

Anyone interested in what kind of materials / frames / lockets / fan sticks that are available at the moment? Just scroll down to the bottom of the "Portrait miniatures" or "Fans" pages. The "Prices & conditions" page is finally completed, and there is a silk fan for sale on the sales page!
:-)

Tuesday, January 31, 2012

Finally...

After three years (!) of frustration, I am able to update my own homepage (blog)! Being one of those poor artists with no knowledge in html, I was left to the mercy of a webmaster when building my old website... and things did not go exactly as planned. (Sometimes I really hate the internet).

Anyway, this page is still under construction, but I have managed to fill it with quite a lot of photos of custom and sold work - feel free to browse around! :-)